Session replay installation

Last updated:

|Edit this page

Session replay enables you to record users navigating through your website or mobile app and play back the individual sessions to watch how real users use your product.

🚧 NOTE: Flutter is considered beta and is free while in beta. We are keen to gather as much feedback as possible so if you try this out please let us know. You can send feedback via the in-app support panel or one of our other support options.

Step one: Add PostHog to your app

Session replay requires PostHog Flutter SDK version >= 4.7.0, and it's recommended to always use the latest version.

PostHog is available for install via Pub.

Configuration

Set your PostHog API key and change the automatic event tracking on if you wish the library to take care of it for you.

Remember that the application lifecycle events won't have any special context set for you by the time it is initialized. If you are using a self-hosted instance of PostHog you will need to have the public hostname or IP for your instance as well.

To start, add posthog_flutter to your pubspec.yaml:

pubspec.yaml
# rest of your code
dependencies:
flutter:
sdk: flutter
posthog_flutter: ^4.0.1
# rest of your code

Then complete the set up for each platform:

For Session replay, you must setup the SDK manually by disabling the com.posthog.posthog.AUTO_INIT mode.

Android setup

There are 2 ways of initializing the SDK, automatically and manually.

Automatically:

Add your PostHog configuration to your AndroidManifest.xml file located in the android/app/src/main:

android/app/src/main/AndroidManifest.xml
<manifest xmlns:android="http://schemas.android.com/apk/res/android" package="your.package.name">
<application>
<!-- ... other configuration ... -->
<meta-data android:name="com.posthog.posthog.API_KEY" android:value="<ph_project_api_key>" />
<meta-data android:name="com.posthog.posthog.POSTHOG_HOST" android:value="https://us.i.posthog.com" /> <!-- usually 'https://us.i.posthog.com' or 'https://eu.i.posthog.com' -->
<meta-data android:name="com.posthog.posthog.TRACK_APPLICATION_LIFECYCLE_EVENTS" android:value="true" />
<meta-data android:name="com.posthog.posthog.DEBUG" android:value="true" />
</application>
</manifest>

Or manually (more control and more configurations available):

Add your PostHog configuration to your AndroidManifest.xml file located in the android/app/src/main:

android/app/src/main/AndroidManifest.xml
<manifest xmlns:android="http://schemas.android.com/apk/res/android" package="your.package.name">
<application>
<!-- ... other configuration ... -->
<meta-data android:name="com.posthog.posthog.AUTO_INIT" android:value="false" />
</application>
</manifest>

And setup the SDK manually:

Dart
import 'package:flutter/material.dart';
import 'package:posthog_flutter/posthog_flutter.dart';
Future<void> main() async {
// init WidgetsFlutterBinding if not yet
WidgetsFlutterBinding.ensureInitialized();
final config = PostHogConfig('YOUR_API_KEY_GOES_HERE');
config.debug = true;
config.captureApplicationLifecycleEvents = true;
// or EU Host: 'https://eu.i.posthog.com'
config.host = 'https://us.i.posthog.com';
await Posthog().setup(config);
runApp(MyApp());
}

In both cases, you'll also need to update the minimum Android SDK version to 21 in android/app/build.gradle:

android/app/build.gradle
// rest of your config
defaultConfig {
minSdkVersion 21
// rest of your config
}
// rest of your config

iOS setup

There are 2 ways of initializing the SDK, automatically and manually.

You'll need to have Cocoapods installed.

Automatically:

Add your PostHog configuration to the Info.plist file located in the ios/Runner directory:

ios/Runner/Info.plist
<?xml version="1.0" encoding="UTF-8"?>
<!DOCTYPE plist PUBLIC "-//Apple//DTD PLIST 1.0//EN" "http://www.apple.com/DTDs/PropertyList-1.0.dtd">
<plist version="1.0">
<dict>
<!-- rest of your configuration -->
<key>com.posthog.posthog.API_KEY</key>
<string><ph_project_api_key></string>
<key>com.posthog.posthog.POSTHOG_HOST</key>
<string>https://us.i.posthog.com</string>
<key>com.posthog.posthog.CAPTURE_APPLICATION_LIFECYCLE_EVENTS</key>
<true/>
<key>com.posthog.posthog.DEBUG</key>
<true/>
</dict>
</plist>

Or manually (more control and more configurations available):

Add your PostHog configuration to the Info.plist file located in the ios/Runner directory:

ios/Runner/Info.plist
<?xml version="1.0" encoding="UTF-8"?>
<!DOCTYPE plist PUBLIC "-//Apple//DTD PLIST 1.0//EN" "http://www.apple.com/DTDs/PropertyList-1.0.dtd">
<plist version="1.0">
<dict>
<!-- rest of your configuration -->
<key>com.posthog.posthog.AUTO_INIT</key>
<false/>
</dict>
</plist>

And setup the SDK manually:

Dart
import 'package:flutter/material.dart';
import 'package:posthog_flutter/posthog_flutter.dart';
Future<void> main() async {
// init WidgetsFlutterBinding if not yet
WidgetsFlutterBinding.ensureInitialized();
final config = PostHogConfig('YOUR_API_KEY_GOES_HERE');
config.debug = true;
config.captureApplicationLifecycleEvents = true;
// or EU Host: 'https://eu.i.posthog.com'
config.host = 'https://us.i.posthog.com';
await Posthog().setup(config);
runApp(MyApp());
}

In both cases, you'll need to set the minimum platform version to iOS 13.0 in your Podfile:

ios/Podfile
platform :ios, '13.0'
# rest of your config

Web setup

For Web, add your Web snippet (which you can find in your project settings) in the <header> of your web/index.html file:

web/index.html
<!DOCTYPE html>
<html>
<head>
<!-- ... other head elements ... -->
<script async>
!function(t,e){var o,n,p,r;e.__SV||(window.posthog=e,e._i=[],e.init=function(i,s,a){function g(t,e){var o=e.split(".");2==o.length&&(t=t[o[0]],e=o[1]),t[e]=function(){t.push([e].concat(Array.prototype.slice.call(arguments,0)))}}(p=t.createElement("script")).type="text/javascript",p.crossOrigin="anonymous",p.async=!0,p.src=s.api_host+"/static/array.js",(r=t.getElementsByTagName("script")[0]).parentNode.insertBefore(p,r);var u=e;for(void 0!==a?u=e[a]=[]:a="posthog",u.people=u.people||[],u.toString=function(t){var e="posthog";return"posthog"!==a&&(e+="."+a),t||(e+=" (stub)"),e},u.people.toString=function(){return u.toString(1)+".people (stub)"},o="capture identify alias people.set people.set_once set_config register register_once unregister opt_out_capturing has_opted_out_capturing opt_in_capturing reset isFeatureEnabled onFeatureFlags getFeatureFlag getFeatureFlagPayload reloadFeatureFlags group updateEarlyAccessFeatureEnrollment getEarlyAccessFeatures getActiveMatchingSurveys getSurveys getNextSurveyStep onSessionId".split(" "),n=0;n<o.length;n++)g(u,o[n]);e._i.push([i,s,a])},e.__SV=1)}(document,window.posthog||[]);
posthog.init(
'<ph_project_api_key>',
{
api_host:'https://us.i.posthog.com', // 'https://us.i.posthog.com' or 'https://eu.i.posthog.com'
}
)
</script>
</head>
<!-- other elements -->
</html>

For more information please check: https://posthog.com/docs/libraries/js

Widget and Observer setup

Wrap your app with the PostHogWidget Widget and Install the PosthogObserver Observer.

Dart
import 'package:flutter/material.dart';
import 'package:posthog_flutter/posthog_flutter.dart';
class MyApp extends StatefulWidget {
const MyApp({super.key});
State<MyApp> createState() => _MyAppState();
}
class _MyAppState extends State<MyApp> {
void initState() {
super.initState();
}
Widget build(BuildContext context) {
return PostHogWidget(
child: MaterialApp(
navigatorObservers: [PosthogObserver()],
title: 'My App',
home: const HomeScreen(),
),
);
}
}

Step two: Enable session recordings in your project settings

Enable session recordings in your PostHog Project Settings.
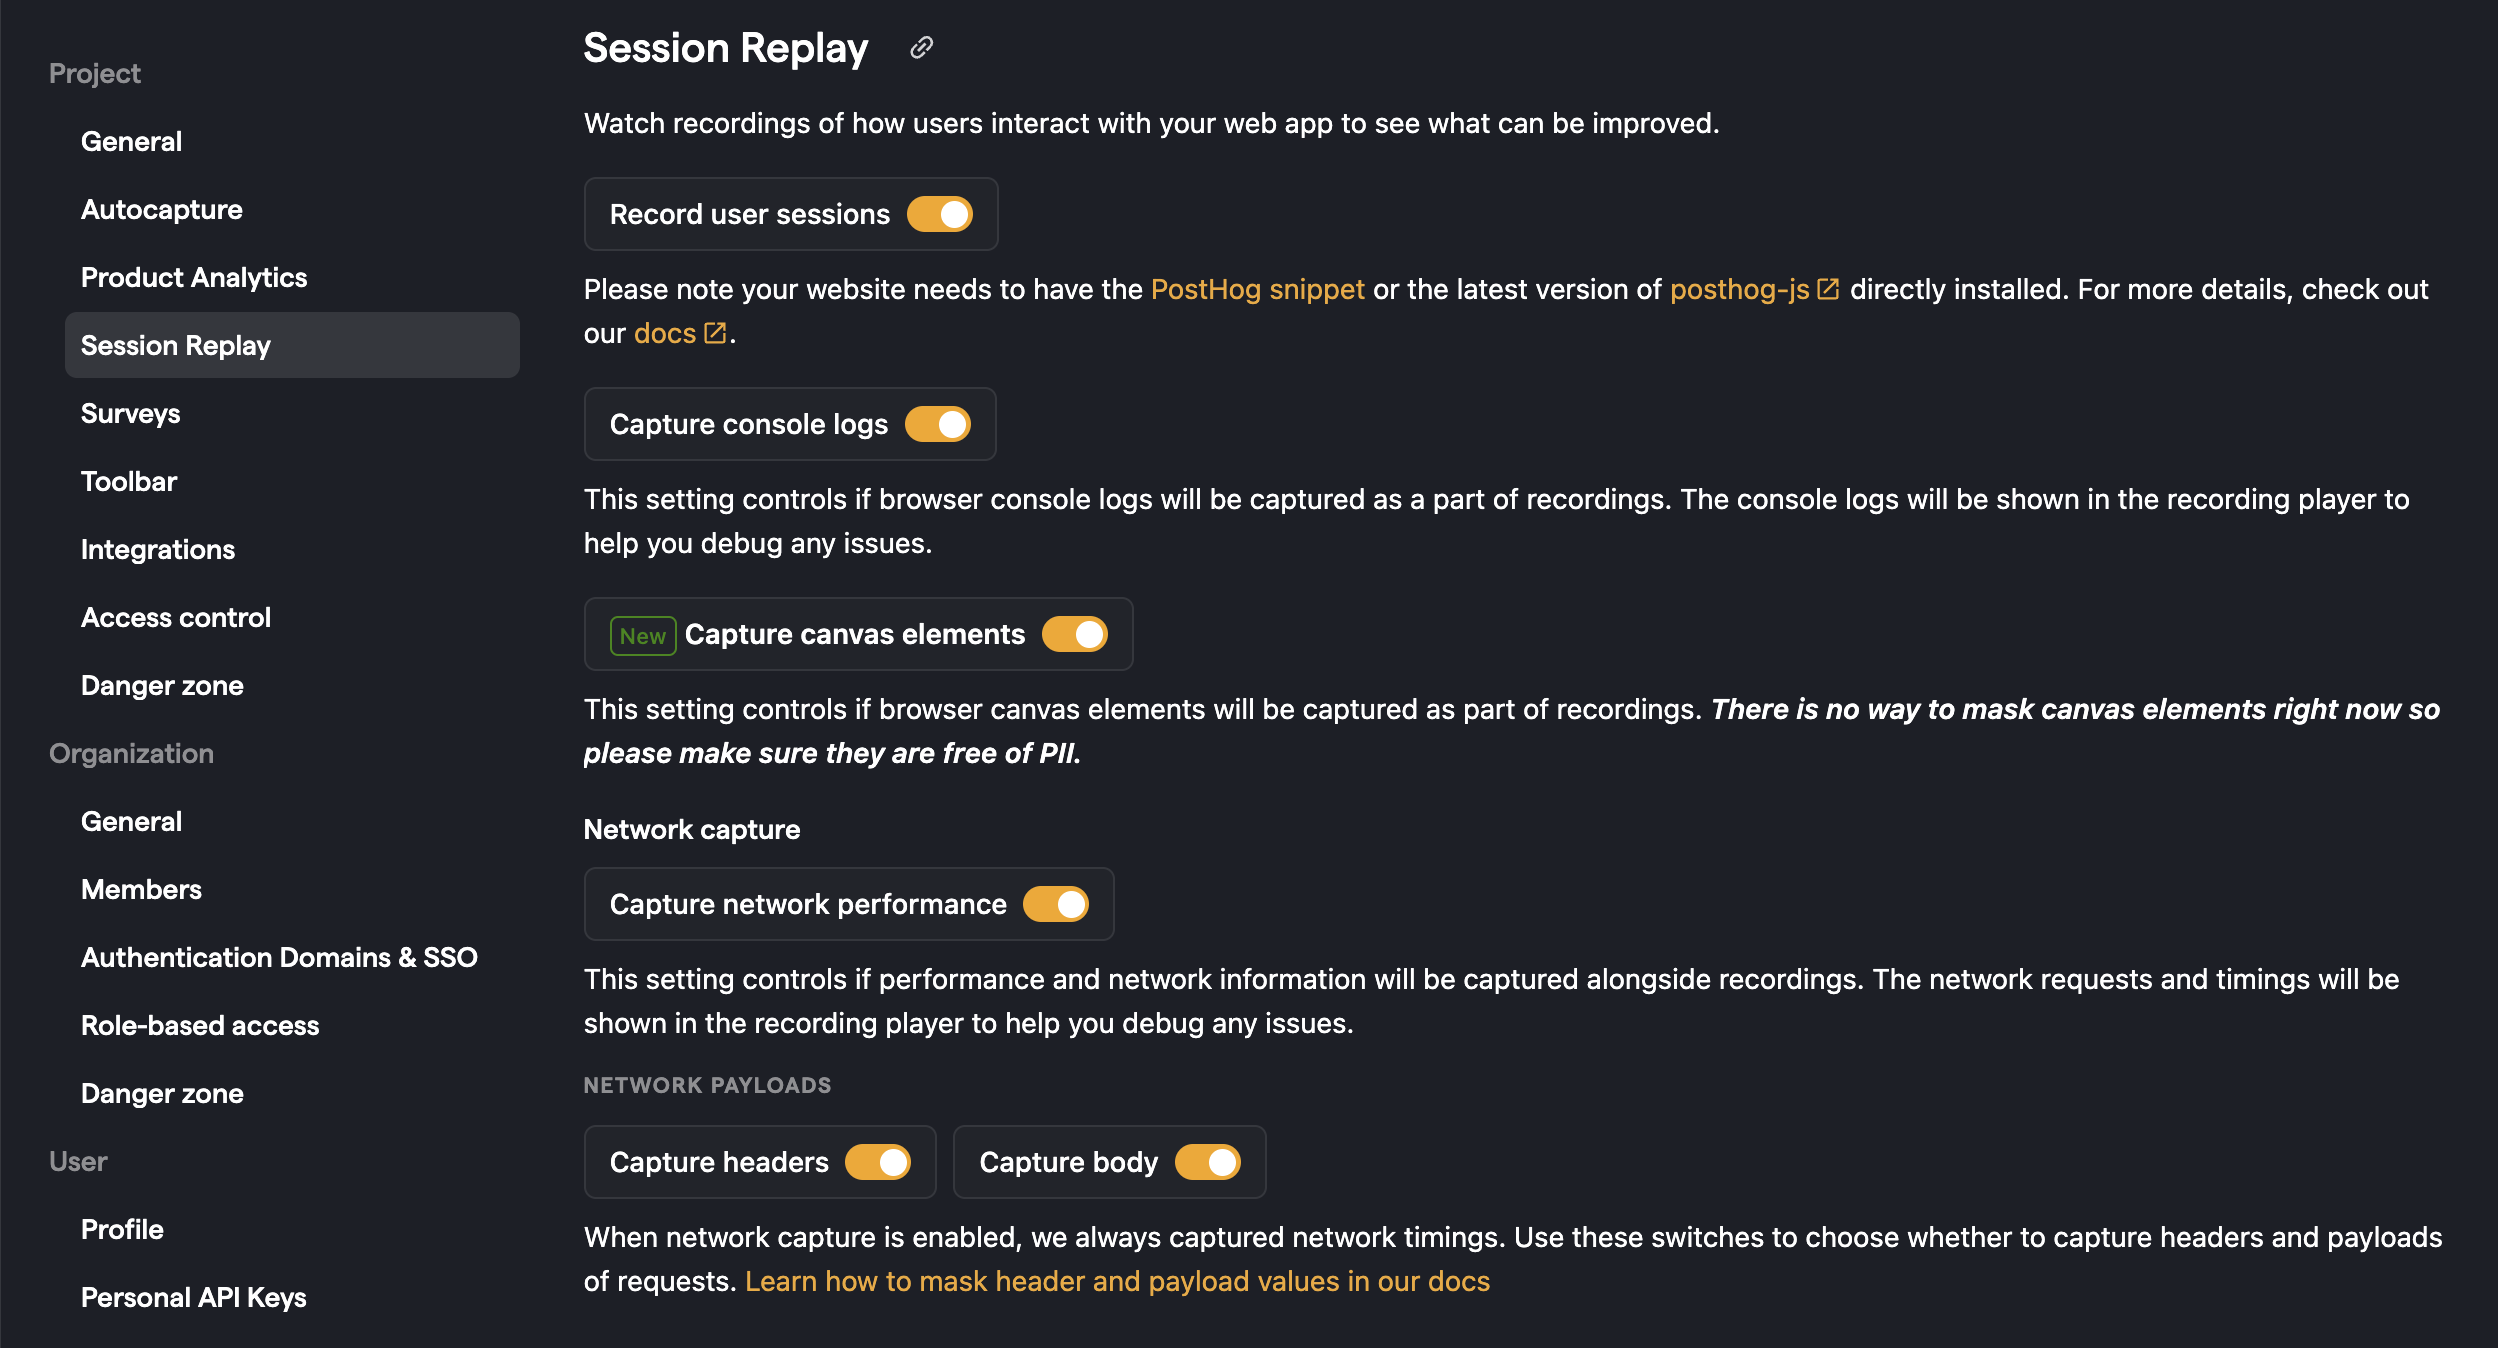
Enable session recordings in your PostHog'

Step three: Configure replay settings

Add sessionReplay = true to your PostHog configuration alongside any of your other configuration options:

Dart
final config = PostHogConfig('<ph_project_api_key>');
/// Enable Recording of Session replay for Android and iOS.
/// Requires Record user sessions to be enabled in the PostHog Project Settings.
/// Experimental support.
/// Defaults to false.
config.sessionReplay = true;
/// Enable masking of all text and text input fields.
/// Default: true.
config.sessionReplayConfig.maskAllTexts = false;
/// Enable masking of all images.
/// Default: true.
config.sessionReplayConfig.maskAllImages = false;
/// Throttling delay used to reduce the number of snapshots captured and reduce performance impact.
/// This is used for capturing the view as a screenshot.
/// The lower the number, the more snapshots will be captured but higher the performance impact.
/// Experimental support.
/// Defaults to 1s.
/// Ps: it was called [debouncerDelay] until version 4.7.1
config.sessionReplayConfig.throttleDelay = const Duration(milliseconds: 1000);

Limitations

  • On Android, requires API >= 26.
  • On iOS, minimum deployment target is iOS13
  • Wireframe mode isn't supported, only screenshot mode.
  • Network performance recording isn't supported yet.

Troubleshooting

  • Run a clean build if you experience issues.
  • Update your iOS Pods.

Questions? Ask Max AI.

It's easier than reading through 560 docs articles.

Community questions

Was this page useful?

Next article

How to watch recordings

To watch recordings, you can visit the Replay page. When watching replays, you can change the playback speed, as well as select the option 'skip inactivity' - this skips parts of the recording where the user was inactive on the page. You can also watch recordings by clicking on any data point in an insight. This opens a list of persons and displays a "watch recording" button if available. This is especially useful in funnels , where you can drill down and watch recordings of users who…

Read next article

PostHog.com doesn't use third party cookies - only a single in-house cookie.

No data is sent to a third party.

Ursula von der Leyen, President of the European Commission